Mixing .Net and Assembly Language in a standalone 32-bit exe

This article is related to Mixing .Net and Assembly Language in a standalone 64-bit exe.
Most of what has been said there applies here, but I decided to repeat again every detail, even running the risk of being considered repetitive and boring.
This article uses the mentioned Steve Teixeira’s technique for building standalone .exe files, but this time we will be building a 32-bit, not a 64-bit .exe file. Since we are going to statically link compiled 32-bit Assembly Language (or ASM), which is CPU dependent, you will have to take that into account when configuring the platform target on your .Net projects.
Using the code:
1) Assembly Language
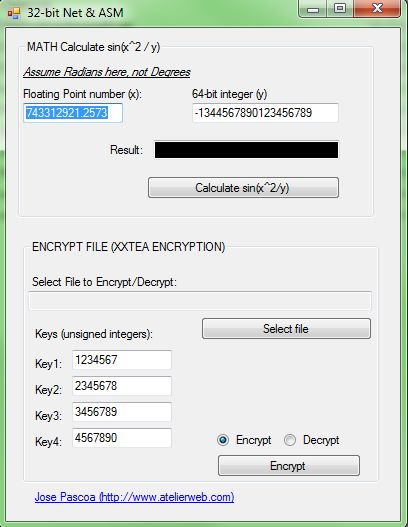
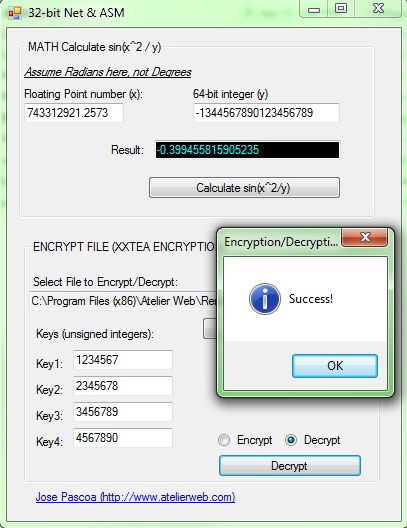
I developed two ASM routines that will be called from .Net. One performs a small Math calculation. The other is a very fast encryption/decryption routine using the XXTEA alghorithm (http://en.wikipedia.org/wiki/XXTEA). The XXTEA alghorithm is a very strong encryption alghorithm, but not to be used when the security of a nation depends on it because a small number of people appear to know how to attack it. Anyway, we are not going to discuss cryptography here.
The routine that performs the Math calculation sin(val1^2 / val2) is shown below, just small like this:
;double AsmMathCalc (double val1, LONGLONG val2);
AsmMathCalc proc val1:MMWORD, val2:SQWORD
local val3:SQWORD
fld qword ptr [val1]
fmul qword ptr [val1]
fstp qword ptr [val1]
fild qword ptr [val2]
fdivr qword ptr [val1]
fstp qword ptr [val3]
fld qword ptr [val3]
call sin
ret ; result is in the top of FPU stack
AsmMathCalc endp
The routine that performs the encryption/decryption is not shown here due to its length, you need to download to see it. It opens the file to be encrypted (or decrypted) and creates a file for the encrypted (decrypted) output. Then reads and encrypts (or decrypts) in chunks and writes to the new file. Encrypted files are saved with the extension “.enc” added to the full file name, decrypted files add the extension “.dec”. Note that XXTEA works with 32-bit words, if the file length in bytes is not divisible by 4, we have to send more “4-filesize modulo 4” bytes to make up for the difference.
2) C++/CLR code to interop with the ASM
My approach was to create a classe library C++ project. Then I placed the parts dealing with the managed code and unmanaged code in separate source code files.
Managed code:
#pragma once
#include "native.h"
using namespace System;
namespace CInterop {
//public ref class ASMCallingClass
ref class ASMCallingClass
{
public :
static double ASMMathCalc(double val1, LONGLONG val2)
{
return runAsmCalc(val1, val2);
}
static int ASMXXTea(LPWSTR fileName, LPDWORD Key, BOOL encode)
{
return runAsmXXTea(fileName, Key, encode);
}
};
}
Unmanaged code:
extern "C"
{
// This is different between 32-bit and 64-bit source files.
// However, we could have used this file in 64-bit (the "stdcall"
// would have been ignored
double _stdcall AsmMathCalc (double val1, LONGLONG val2);
int _stdcall AsmXXTEAEncDec(LPWSTR val1, LPDWORD val2, BOOL val3); }
double runAsmCalc(double val1, LONGLONG val2)
{
return AsmMathCalc(val1, val2);
}
int runAsmXXTea(LPWSTR fileName, LPDWORD Key, BOOL encode)
{
return AsmXXTEAEncDec(fileName, Key, encode);
}
Just for testing purposes you can add the ASM compiled object file to Properties\Linker\Input\Additional Dependencies, but this will not be used in the final building process because we will build all from the command line.
3) C# Windows Forms Application
In this project add a “using” clause for the C++/CLR namespace. If you have built the C++/CLR class library, you can test now if all is working. If it does not, make public the class ASMCallingClass in the interop project and rebuild the library.
Building
You have three projects in total: The ASM project, the C++/CLR interop project and the C# project.
To be able to build a single executable, you need to compile in dependency order. Native code first, second the interop code and finally the 100% managed code.
Open a console Window with the environment set for Visual Studio x86 compilations, (in the Start menu you may find Visual Studio Command Prompt, which is what we need).
1) Compile the ASM with with the MASM compiler:
ml /c asmrotines.asm
(or with jwasm using <path>\jwasm -coff asmrotines.asm)
Note: You must test the ASM routines while you code them, because it is very easy to insert bugs in ASM. There are various ways of doing that. For my demo program, I just linked the asmrotines.obj with a test program written in C, under Visual Studio. The reason is that Visual Studio C++ IDE has a built-in disassembler and you can single step the ASM instructions. But a better way of debugging under Visual Studio is to compile the ASM inside the IDE. However, Visual Studio does not recognize ASM, so you will have to tell it what program to call to compile the ASM. This is done with Custom Build instructions. Visual Studio comes ex-factory with rules for building with MASM, other assemblers have to supply those rules. JWasm comes with rules for Visual Studio 2005 and 2008, but they are not suitable for Visual Studio 2010. For Visual Studio 2010, I spent sometime converting them and you can download them here. More information about Custom Builds is available here.
2) Copy the compiled ASM file, asmrotines.obj, to the folder where are the source files of your C++/CLR interop project and change your console window to that folder.
3) Compile the native code source file, which has the “native.cpp” name in our project. The command line is:
cl /c /MD native.cpp
The C/C++ compiler will generate the object file “native.obj”
4) Now, compile the managed file, “CInterop.cpp” in our project with the following command line:
cl /clr /LN /MD CInterop.cpp native.obj asmrotines.obj
The /clr switch generates mixed mode code, /LN creates a .netmodule and /MD links with MSVCRT.LIB. Because this module contains a reference to the native code, we also need to pass native.obj and asmrotines.obj so that this file can be passed through to the link line when the compiler invokes the linker to produce the .netmodule. This is basically the explanation given by Mr. Steve Teixeira.
5) Now, copy to the folder where the C# files are, asmrotines.obj, CInterop.obj, native.obj, and CInterop.netmodule and change the console window to that folder.
6) Run the C# compiler with the following command line:
csc /target:module /unsafe /addmodule:cinterop.netmodule Program.cs Form1.cs Form1.Designer.cs Properties\AssemblyInfo.cs
7) Finally, run the Microsoft Linker to link together all the parts we have been building along the way.
link /LTCG /CLRIMAGETYPE:IJW /ENTRY:Charp.Program.Main /SUBSYSTEM:WINDOWS /ASSEMBLYMODULE:cinterop.netmodule /OUT:NetAndAsm.exe cinterop.obj native.obj asmrotines.obj program.netmodule
And that’s all about it!
Download the full source code!